
 I've been wanting to post this tutorial for YEARS now. The quilt is called Freda's Beehive. Several years ago I had a dream about making this quilt. I woke up in the middle of night, got out of bed and sketched this quilt block. I am a simple quilter at heart and I love squares and patchwork so a patchwork beehive seemed perfect.
 I made this quilt once for myself and then 3 more times for trades and a sale. I've had requests for the pattern over the years and I've always intended to put the pattern together. But since I have so many supportive readers of my blog, I thought it would be good to offer the quilt idea/block as a tutorial.
 Freda's Beehive Quilt Block Tutorial:
All seams are .25" and press as you go. Read all instructions before cutting fabric. Following the block tutorial is a very simplified instruction for putting the quilt together.
 This is the basic beehive block. I'll go through the steps for making the block.
 *Cutting for one primary block:


 This is the basic beehive block. I'll go through the steps for making the block.
 *Cutting for one primary block:
 8) brown print/tan 2.5" squares
1) black dot or tiny gingham 2.5" square
2) brown 1.25" squares
2) white 2.5" squares
4) 2.5" x 6.5" inner sashing strips bee print or yellow dot fabric
4) 2.5" inner corner squares bee print or flower/fruit print fabric
4) 3.5" x 10.5" outer sashing yellow stripe or gingham fabric
4) 3.5" outer squares dot fabric
*This block is made with primary and secondary blocks. The secondary blocks need everything except only need 2) 3.5" x 10.5" outer sashing strips and do not need 3.5" outer squares dot fabric. This is the same for the secondary row blocks.

Construction:
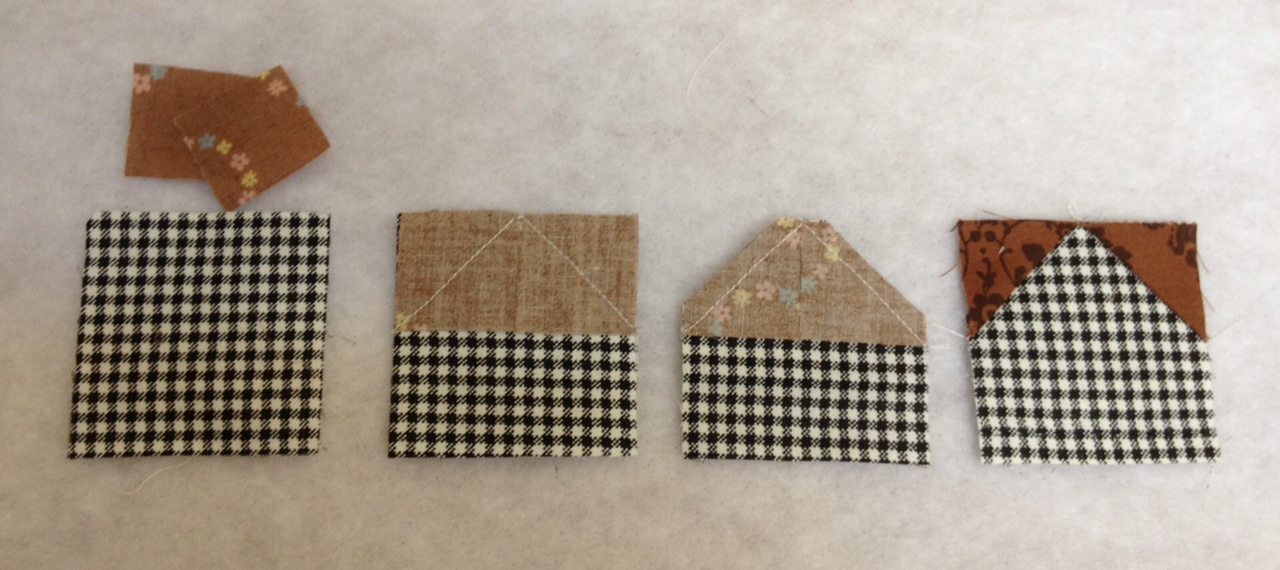
Match up both 2.5" white squares with two 2.5" squares from brown print. Stitch corner to corner diagonally. Trim seam allowance to .25". Open to make half square triangle block.
 Place the 1.25" squares on either corner of the black gingham/dot fabric. Stitch diagonally in the corners, trim seam and open.
 Make 3 rows with 3 squares in each row as above. Join rows together to form beehive.
 Stitch 2 inner corner squares to either end of 2 inner sashing strips. Stitch sashing strips to either side of the beehive and then stitch the joined corner sashing strips to bottom/top of beehive block.
 Repeat for outer sashing.
 This would be a finished primary beehive block.
 Create rows of beehives by starting with a primary block and then adding a secondary block. The secondary blocks have the outer sashing just on the top/bottom of the block. The next block in the row would be another primary block.
 Alternate primary and secondary blocks to create as long a row needed.
 There are also primary and secondary rows as well. Secondary row sashing will be a 3.5" x 10.5" strip in between each block (and at the beginning of the secondary row) with no outer corner squares.
 This is just a very easy quilt to make. I've made a few minor adjustments since making my first version of the quilt. It would be a good exchange block or quilting bee block that any level of quilter could easily put together.
 This is just a very easy quilt to make. I've made a few minor adjustments since making my first version of the quilt. It would be a good exchange block or quilting bee block that any level of quilter could easily put together.
I'm super busy this week so I won't post again until next week. If you have any questions or corrections, just email me. Thanks. Have a great week.
-nanette

33 comments
OMW.....this is the cutest, cutest, cutest quilt!!!! Thanks so much for the tutorial. Have a great Monday!
This is such a cute block! Thanks so much for sharing...
Jennifer :)
This is so adorable...thanks for the great tutorial!!
~Terry~
Nanette, that is such a sweet quilt, and how sweet of you to post a tutorial! You have a generous, giving heart!
Thanks so much for the tutorial, it is a really darling quilt. I'm going to go right now and look through my stash, I know I have some fabric with bees on it ... somewhere.
Hope your super busy week is a good one!
lovely quilt,,,,,,great homemade honey, and honey bee colors also,,,,reminds me of honey bees loving my in bloom pussywillow tree,,,,,hundred humming around the tree,,,,,,tks for the grt directions also,,,for those of us needing grt instructions.
I love this block and the quilt. Thank you for the tutorial!
What a cute little block! Love your creativity! Glad to hear I'm not alone with my ideas keeping up at night.
Oh how cute! What a sweet little bee hive! :o) Any busy little bee would be delighted to live there! :o)
Have a nice week.
thank you so much for sharing your bee hive pattern, it really is just too stinkin' cute! you are very generous!
Absolutely adorifying!
I think I need to make this quilt in honor of YOU! I remember seeing the quilt at your house, and it's such a perfect representation of Freda's Hive.
Oh Nanette! What an adorable quilt block!!! Well, and quilt -- I LOVE it!!!
Oh it is wonderful! What a great quilt and tutorial!
Thank you for sharing the tutorial for the lovely block.
I love you! I have wanted to make this ever since I saw you post the picture I don't even know how long ago. I have a collection of fabrics all ready to go. Deborah means "bee" and I am a bee collector. The day school is out, this puppy is getting made! Like I said, I love you!
Deborah (who will be busy as a bee!)
Very cute and very you! So glad you shared.
Too cute, Nanette!
I can definitely see some of these bee hives in my future. We can play with these forever without getting stung!
Thanks for sharing!
This is such a sweet block! Thank you for sharing, Freda!
Love. It. Cute fussy cutting which I love to do. Thanks for the tutorial, oh most talented one!
Oh, thanks for sharing such a sweet block with us.
That is soooooo cute. Thank you for doing the tutorial on it. What a cute little quilt that would be on my kitchen table. :)
I 'need' to make this one!!!
thank you. thank you. thank you. i am going to try to make at least 1 block because i love it so much.
Oh so cute! Great tute, Nanette!
Perfect tute! I love it and will make a pdf file for it. I have had a few ideas, but too lazy to get out of bed, I'm glad you did!
Since my state of "origin" is the Beehive State ... I need to make myself some of these.
Excellent tutorial,
Mary
I love this block... Perfect for our Beehive State. Thank you for sharing!
Thanks for posting this Nanette. Maxx is gone this week and I'm going to try and get 70 squares done but I couldn't remember how to put them together.
Can't wait to see you in a month!
I really loved the post so I used my Digg account to digg it.. It's hard to find knowledgeable individuals on this matter, but you sound like you already know what you're talking about! Thanks A rise in Amazing A lot more.
Tony@Jakarta Hotel
I know where I'm going and l know the truth, and I don't have to be what you want me to be. I'm free to be what I want.thankyou i really love it. canon Printer Driver
Hampura nya, ayeuna dibalaan heula blog na ku komentaran sampah.
ulah di tutup kolom komentaran na, supaya urang bisa nyampah deui heeh..
Penyebab Iritasi Pada Kulit Cara Alami Menghilangkan Abses Pada Payudara Cara Alami Mengobati & Menyembuhkan Benjolan Di Rahim Obat Herbal yang Bagus untuk Menyembuhkan Penyakit Dompo Cara Mengobati Luka Jahitan yang Infeksi dan Bernanah Makanan yang Ampuh Menurunkan Kolesterol Tinggi Daftar Makanan & Minuman Pembakar Lemak Tubuh untuk Menurunkan Berat Badan Cara Menghilangkan Budug
Obat Patah Tulang Obat Herbal untuk Membantu Menghilangkan Benjolan Di Payudara
thank you for giving a very cute Quilt Block Tutorial. I am very happy
Visit My Website : poker45.com
Post a Comment